概述
在网络应用中,身份认证和授权操作是最基本的安全保证,在 Spring 全家桶中就提供了一个专门用于权限控制的框架——Security,这个框架在 Spring 应用中使用起来非常方便,支持多种认证和授权方式,还能够起到预防网络攻击的作用。
概念
是什么
Spring Security 是一个强大的高度定制化的身份认证和访问权限控制框架,是基于 Spring 项目的标准权限框架。Spring Security 着重 java 应用的身份认证和授权管理,在 Spring 项目中使用起来非常方便。
能做什么
同类产品
快速开始
demo 项目源码
https://e.coding.net/wqf31415/spring-security-demo.git
basal 分支
创建 Spring Boot 项目
使用 IDE 或 https://start.spring.io 创建一个项目,依赖选择 Spring Web 、Spring Security 。项目 pom.xml 如下所示:
1
2
3
4
5
6
7
8
9
10
11
12
13
14
15
16
17
18
19
20
21
22
23
24
25
26
27
28
29
30
31
32
33
34
35
36
37
38
39
40
41
42
43
44
45
46
47
48
49
50
51
52
53
54
55
56
57
| <?xml version="1.0" encoding="UTF-8"?>
<project xmlns="http://maven.apache.org/POM/4.0.0" xmlns:xsi="http://www.w3.org/2001/XMLSchema-instance"
xsi:schemaLocation="http://maven.apache.org/POM/4.0.0 http://maven.apache.org/xsd/maven-4.0.0.xsd">
<modelVersion>4.0.0</modelVersion>
<groupId>xyz.wqf</groupId>
<artifactId>securitydemo</artifactId>
<version>0.0.1-SNAPSHOT</version>
<packaging>jar</packaging>
<name>securitydemo</name>
<description>Demo project for Spring Bootsecurity</description>
<parent>
<groupId>org.springframework.boot</groupId>
<artifactId>spring-boot-starter-parent</artifactId>
<version>1.5.10.RELEASE</version>
<relativePath/>
</parent>
<properties>
<project.build.sourceEncoding>UTF-8</project.build.sourceEncoding>
<project.reporting.outputEncoding>UTF-8</project.reporting.outputEncoding>
<java.version>1.8</java.version>
</properties>
<dependencies>
<dependency>
<groupId>org.springframework.boot</groupId>
<artifactId>spring-boot-starter-security</artifactId>
</dependency>
<dependency>
<groupId>org.springframework.boot</groupId>
<artifactId>spring-boot-starter-web</artifactId>
</dependency>
<dependency>
<groupId>org.springframework.boot</groupId>
<artifactId>spring-boot-starter-test</artifactId>
<scope>test</scope>
</dependency>
<dependency>
<groupId>org.springframework.security</groupId>
<artifactId>spring-security-test</artifactId>
<scope>test</scope>
</dependency>
</dependencies>
<build>
<plugins>
<plugin>
<groupId>org.springframework.boot</groupId>
<artifactId>spring-boot-maven-plugin</artifactId>
</plugin>
</plugins>
</build>
</project>
|
配置类
创建一个类,用来配置 Spring Security ,这个类需要继承 WebSecurityConfigurerAdapter ,然后覆写其中两个方法,一个是 protected void configure(HttpSecurity http) throws Exception ,用来配置访问权限,另一个是 protected void configure(AuthenticationManagerBuilder auth) throws Exception ,用来添加自己定义的用户信息(用户名、密码、角色)。
注意在这个配置类上,需要加 @EnableWebSecurity 和 @Configuration 两个注解。
1
2
3
4
5
6
7
8
9
10
11
12
13
14
15
16
17
18
19
20
21
22
23
24
25
26
27
28
29
30
31
32
33
34
35
36
37
38
39
40
| package xyz.wqf.config;
import org.springframework.context.annotation.Configuration;
import org.springframework.security.config.annotation.authentication.builders.AuthenticationManagerBuilder;
import org.springframework.security.config.annotation.method.configuration.EnableGlobalMethodSecurity;
import org.springframework.security.config.annotation.web.builders.HttpSecurity;
import org.springframework.security.config.annotation.web.configuration.EnableWebSecurity;
import org.springframework.security.config.annotation.web.configuration.WebSecurityConfigurerAdapter;
@Configuration
@EnableWebSecurity
public class WebSecurityConfig extends WebSecurityConfigurerAdapter {
@Override
protected void configure(HttpSecurity http) throws Exception {
http
.authorizeRequests()
.anyRequest()
.authenticated()
.and()
.formLogin()
.permitAll()
.and()
.logout()
.permitAll();
}
@Override
protected void configure(AuthenticationManagerBuilder auth) throws Exception {
auth.inMemoryAuthentication()
.withUser("user")
.password("user")
.roles("USER")
.and()
.withUser("admin")
.password("admin")
.roles("ADMIN","USER")
;
}
}
|
注意上面代码中注释掉了一行,.roles() 和 .authorities() 方法用于设置角色、权限,但不能同时使用,同时使用时哪个放在后面哪个生效。
两者不同的是 role 添加进去的时候,spring security 默认帮你加个前缀 ROLE_ ,authority 不加前缀
添加一个测试的请求
为了简单,我们直接在项目启动类中添加测试的请求方法:
1
2
3
4
5
6
7
8
9
10
11
12
13
14
15
16
17
18
19
20
21
22
23
24
25
26
27
28
29
30
31
32
33
34
35
36
37
| package xyz.wqf;
import org.slf4j.Logger;
import org.slf4j.LoggerFactory;
import org.springframework.boot.SpringApplication;
import org.springframework.boot.autoconfigure.SpringBootApplication;
import org.springframework.core.env.Environment;
import org.springframework.web.bind.annotation.RequestMapping;
import org.springframework.web.bind.annotation.RestController;
import javax.servlet.http.HttpServletRequest;
import java.net.InetAddress;
import java.net.UnknownHostException;
@SpringBootApplication
@RestController
public class SecuritydemoApplication {
private static final Logger logger = LoggerFactory.getLogger(SecuritydemoApplication.class);
public static void main(String[] args) throws UnknownHostException {
SpringApplication app = new SpringApplication(SecuritydemoApplication.class);
Environment env = app.run(args).getEnvironment();
logger.info("\n--------------------------------------------\n" +
"\tApplication {} is running! Access URLs:\n" +
"\tLocal\thttp://localhost:{}\n" +
"\tExternal\thttp://{}:{}",
env.getProperty("spring.application.name"),
env.getProperty("server.port"),
InetAddress.getLocalHost().getHostAddress(),
env.getProperty("server.port"));
}
@RequestMapping("/hello")
public String hello(HttpServletRequest request){
return "hello, "+ request.getRemoteUser();
}
}
|
运行与测试
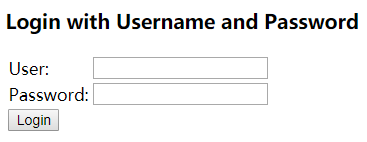
运行项目,在浏览器访问项目,发现页面自动跳转到了一个登陆页面,可以输入我们配置好的用户名、密码进行登陆。如我们使用 admin 用户登陆,密码也是 admin。

登陆成功之后还是 404 的错误提示页,是因为我们还没给项目添加首页页面。我们访问定义的测试接口 /hello ,即访问地址 http://localhost:8080/hello ,页面显示 hello, admin ,测试完成。
配置类说明
配置类中重写了 configure(AuthenticationManagerBuilder auth) 和 configure(HttpSecurity http) 方法。
配置 AuthenticationManager
复写 configure(AuthenticationManagerBuilder auth) 后,应该使用 AuthenticationManagerBuilder 来指定 AuthenticationManager。
例如, 可以使用以下配置在内存中进行注册公开内存的身份验证 UserDetailsService:
1
2
3
4
5
6
7
8
9
10
11
| @Configuration
@EnableWebSecurity
public class WebSecurityConfig extends WebSecurityConfigurerAdapter {
@Override
protected void configure(AuthenticationManagerBuilder auth) {
auth
.inMemoryAuthentication().withUser("user").password("password").roles("USER").and()
.withUser("admin").password("password").roles("USER", "ADMIN");
}
}
|
配置接口访问权限
复写 configure(HttpSecurity http) 这个方法来配置 HttpSecurity,通常,子类不能通过调用 super 来调用此方法,因为它可能会覆盖其配置。 默认配置为:
http.authorizeRequests().anyRequest().authenticated().and().formLogin().and().httpBasic();
HttpSecurity 常用方法及说明
| 方法 |
说明 |
| openidLogin() |
用于基于 OpenId 的验证 |
| headers() |
将安全标头添加到响应 |
| cors() |
配置跨域资源共享( CORS ) |
| sessionManagement() |
允许配置会话管理 |
| portMapper() |
允许配置一个PortMapper(HttpSecurity#(getSharedObject(class))),其他提供SecurityConfigurer的对象使用 PortMapper 从 HTTP 重定向到 HTTPS 或者从 HTTPS 重定向到 HTTP。默认情况下,Spring Security使用一个PortMapperImpl映射 HTTP 端口8080到 HTTPS 端口8443,HTTP 端口80到 HTTPS 端口443 |
| jee() |
配置基于容器的预认证。 在这种情况下,认证由Servlet容器管理 |
| x509() |
配置基于x509的认证 |
| rememberMe |
允许配置“记住我”的验证 |
| authorizeRequests() |
允许基于使用HttpServletRequest限制访问 |
| requestCache() |
允许配置请求缓存 |
| exceptionHandling() |
允许配置错误处理 |
| securityContext() |
在HttpServletRequests之间的SecurityContextHolder上设置SecurityContext的管理。 当使用WebSecurityConfigurerAdapter时,这将自动应用 |
| servletApi() |
将HttpServletRequest方法与在其上找到的值集成到SecurityContext中。 当使用WebSecurityConfigurerAdapter时,这将自动应用 |
| csrf() |
添加 CSRF 支持,使用WebSecurityConfigurerAdapter时,默认启用 |
| logout() |
添加退出登录支持。当使用WebSecurityConfigurerAdapter时,这将自动应用。默认情况是,访问URL”/ logout”,使HTTP Session无效来清除用户,清除已配置的任何#rememberMe()身份验证,清除SecurityContextHolder,然后重定向到”/login?success” |
| anonymous() |
允许配置匿名用户的表示方法。 当与WebSecurityConfigurerAdapter结合使用时,这将自动应用。 默认情况下,匿名用户将使用org.springframework.security.authentication.AnonymousAuthenticationToken表示,并包含角色 “ROLE_ANONYMOUS” |
| formLogin() |
指定支持基于表单的身份验证。如果未指定FormLoginConfigurer#loginPage(String),则将生成默认登录页面 |
| oauth2Login() |
根据外部OAuth 2.0或OpenID Connect 1.0提供程序配置身份验证 |
| requiresChannel() |
配置通道安全。为了使该配置有用,必须提供至少一个到所需信道的映射 |
| httpBasic() |
配置 Http Basic 验证 |
| addFilterAt() |
在指定的Filter类的位置添加过滤器 |
总结
当没有自定义登陆页面时,Spring Security 提供了一个默认的登陆页面,访问需要权限的接口或页面时,需要完成登陆,然后才能正常访问。

